

How To Build Window Cornice Box
How to Build Window Cornices
Updated: Jan. 17, 2019
Custom-build your own window cornices for 1-fourth the price of shop-bought
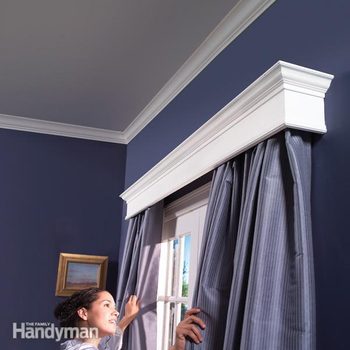
Want to give a dreary room a dramatic facelift? Adding window or door cornices will bring freshness and way to any room decor. They'll hibernate ugly drapery rods and add together a touch of custom-made detailing that makes an ordinary window or patio door look like something special. The top of the cornice tin even serve as a display shelf for art or collectibles. Cornices are surprisingly easy to build, fifty-fifty the elegant ones you see in home magazines. Using off-the-shelf trim from the home eye and a compound miter saw, anyone with simple carpentry skills tin can create a beautiful window or door cornice in but a few hours. Read on and nosotros'll testify you how to select the materials, assemble the parts and attach the cornice to the wall. We'll also share design tips to assist you friction match a cornice fashion to your dwelling decor. Search online for cornice suppliers and you'll see that you can salvage huge money by edifice your own.
You might besides like: TBD
- Time
- Complication
- Cost
- Multiple Days
- Intermediate
- $51–100
Design the cornice to fit your dwelling
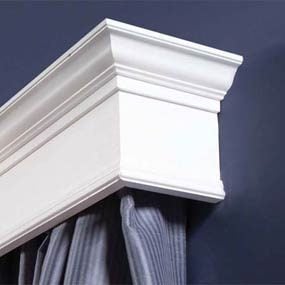
Finished cornice close-upwards
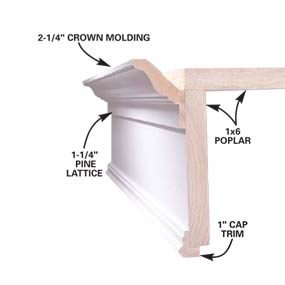
Cornice cross-section and parts
Blueprint elements within your abode should dictate the forest type, molding manner and cease that yous select. Depending on the design, the top either overlaps the sides, sometimes with a routed edge, or is nailed to the top or inside of the box and doesn't show from below. The tops are all-time made from 1x4s, 1x6s or 1x8s. In that location'southward no need to cut the tops to width if you choose the right combination of top style and board size. The example we show is a 1×6 nailed on top of the box, which gives an overall within depth of iv-3/iv in. For the same wait but with a shallower box, y'all could also nail a 1×4 inside the box flush with the top for a depth of three-1/2 in. Choose whichever method it takes to clear your curtains.
Other Cornice Design Options
A Cornices pattern options are almost endless. If y'all're having problem choosing, hither'south a tip. Buy short lengths of dissimilar types of trim forth with some inexpensive 1x4s and 1x6s. Cut everything to i-ft. lengths and mock upwardly several different combinations. But eject a little wood glue on the pieces and clamp them together for well-nigh 10 minutes. Hold the cornice mock-ups over the opening to get a experience for the final wait.
Select materials and collect cardinal tools
If you program to paint your cornices, poplar and aspen are skilful choices for the box materials. They're stable and cheap, and the grain won't show through pigment. Pine and basswood moldings are commonly the to the lowest degree expensive choices for paintable trim.
If you want stained or natural woods cornices, look for oak, mahogany, cherry, maple and others at home centers. The biggest problem is finding hardwood moldings other than oak. Yous may take to special-order them or find a specialty millwork supplier online.
The best tool for cutting miters on wide boards (1x6s) is either a 10-in. compound miter saw or a sliding compound saw. Standard compound saws piece of work like typical miter saws, but the motor and blade tip sideways, making them capable of cutting bevels. A sliding compound miter saw cuts compound angles too, just the motor and blade slide on tracks then it can handle wider stock.
Be sure to employ a precipitous cease-cut blade in either one. Prices for standard compound miter saws are quite low, or you can hire one.
Yous can predrill and paw-nail most of the project, simply an air-powered brad nailer with one and1-i/2-in. brads makes the job much easier. Many are inexpensive and well worth the price. Or you can rent one. (Rent ane of the special airless ones and you lot'll salvage the price of renting a compressor.) But for the money, compound miter saws and brad nailers are far besides useful and far as well fun not to ain yourself.
Gather the basic box
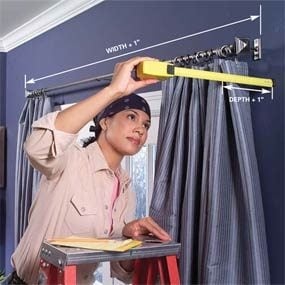
Photo 1: Measure advisedly
Measure out the outside width and depth of curtains, curtain rods or shades that you want to cover and their distances from the wall. Add together ane-in. to make up one's mind the inside box dimensions.
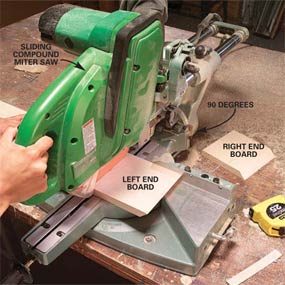
Photo 2: Cut the boards
Cut 45-degree bevels on both ends of the forepart board and on i cease of each end lath. Then reset the saw to xc-degrees and cut the end boards to length.
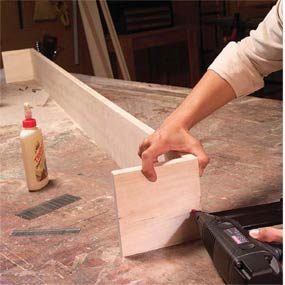
Photo 3: Join the boards
Smear wood glue on the miters and tack the joint together with six i-in. brads, three from each side.

Photograph 4: Adhere the superlative
Cut the top board to length to fit flush with the front and sides of the box (depending on the design). Glue and nail the top to the box frame with one-1/ii in. brads spaced every half dozen-in.
Every forest cornice begins the aforementioned way, with cutting and assembling the 3-sided, lidded box (Photos two – 4). And then yous add together the trim of your choice (Photos 5 – ix) and finish the cornice (Photograph 11). The cornice is and then set for mounting on the wall by screwing it to a one×2 that'southward screwed to the wall above the opening (Photos 12 – 14).
Begin by measuring the curtain and curtain rod for length, depth and width (Photo one). Measure with the curtains open up so you take into account their thickness when bunched. Add an inch or and so to the depth and the width of the pall rod to make sure the cornices volition cover everything.
Miter the ends and forepart box pieces first. It'due south easiest to square up the lath, then tilt the miter saw to cutting a 45-degree bevel for the first cease piece and then square it up to cut the second end (Photo ii). The mitered corners are glued and nailed together with 1-in. brads. Measure the assembly to determine the exact length for the meridian.
Apply the trim
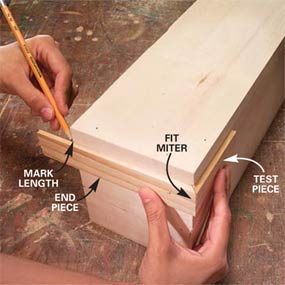
Photo v: Fit the trim
Using a short test slice, fit the end piece and mark and cut information technology to fit. Apply the test piece to accurately position the trim while you gum and nail it to the box. Cutting the miter on the long front piece of trim, fit information technology to the first slice, marking its length, and so cut and spike it. Echo the steps for the other terminate.

Photo half dozen: Cutting the end pieces
Cut the ii crown molding end pieces 1-in. longer than needed with reverse 45-degree angles on one cease of each piece (you lot're cut a right and a left corner).
Tip: Build upwards short fences to support crown moldings while cutting past screwing i×4 boards to the saw fence through the predrilled holes in the fence (shown above).
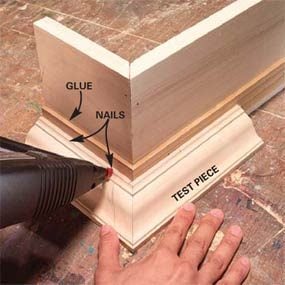
Photo 7: Attach the crown molding
Flip the box upside down and prop the crown molding end slice against the box. Use the other end as a test piece to line upwardly the miters. Mark and cutting the slice to length. Smear a fiddling gum forth the bottom and tack it to the cornices with a couple of 1-in. brads.
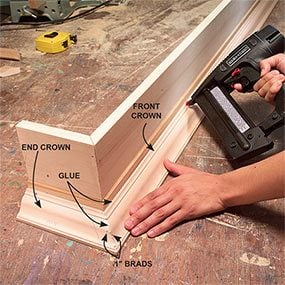
Photo 8: Finish installing the crown molding
Exam-fit, marking and cut the front piece of crown molding to length. Glue and nail the miters together, and so smash the molding to the cornice box. Cut and install the last cease piece of crown molding.
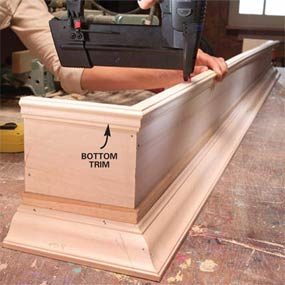
Photograph 9: Install the bottom trim
Cutting, fit, glue and nail the lesser piece of trim to the box using the same techniques you used with the crown molding.
When mitering the trim for the box, e'er start by first cutting and mounting an finish trim piece, so the long front trim and finally the other terminate. That way, you'll be able to cheque fits and get well-baked miters at each corner. Fit each miter, then scribe the length of each piece rather than measuring (Photo five). Information technology'due south faster and much more accurate. Information technology's all-time to cut pieces simply a tad long so you tin shave them down until they fit perfectly. If you' re new to woodworking, it' s nice to have a helper by your side to hold the miters together while you're scribing lengths or fastening parts.
The play a trick on to cut perfect crown molding miters is to rest the molding upside downward and against the bed and argue while cutting the 45-degree angles (Photo 6). If you cut wide crown molding, you may have to extend the fence height by screwing a length of one×4 to the miter saw contend through the holes in the back. Remember that the long bespeak of the miter is e'er the pinnacle edge. That'll help you remember which style to angle the saw before cut. To farther eliminate the plush fault of miscutting, an angle, describe a low-cal line while y'all're fitting the piece to betoken the proper angle (Photograph 6).
Shine and cease cornices
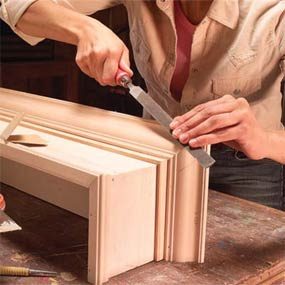
Photo 10: Polish out the profiles
Make full blast holes and any miter gaps in joints with wood filler. Sand excess wood filler and file miters as necessary to remove any forest fibers or smooth out inconsistencies in profiles.
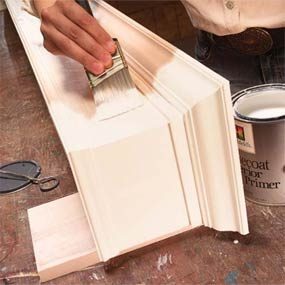
Photo 11: Prime the wood
Prime the wood and lightly sand information technology with 150-grit sandpaper before applying your selection of pigment.
Fill up blast holes and prime number before painting. If your cornices have elaborate details like dentil blocking, you'll get better results with several light coats of spray pigment instead of brushing. Finish highly detailed natural and stained wood with spray lacquer, shellac or polyurethane.
Prepaint the 1×2 cornice ledger to match the wall before you put information technology up if you call back it'll show later the window covering is in place (Photo 13).
Mountain the cornice over the window
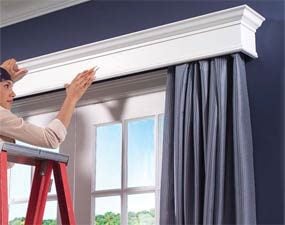
Photograph 12: Middle the cornice
Heart the cornice over the opening at the height that best covers the drape rod and curtain. And then reach underneath and mark the bottom. Take down the cornice and extend the mark with a 4-ft. level.

Photo 13: Install the ledger
Cut a 1×2 to fit betwixt the drapery rod brackets. Screw it through the drywall into the framing with 2-1/2-in. screws spaced about every foot.
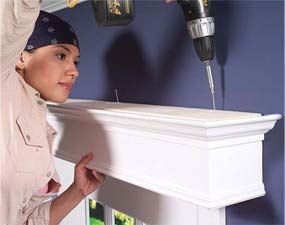
Photo xiv: Drill airplane pilot holes
Predrill 1/eight-in. pilot holes spaced nigh every foot in the top of the cornice 3/4 in. from the dorsum edge. Angle the holes slightly toward the wall. Agree the cornice tight to the wall and run 2-in. screws into the 1×ii.
Required Tools for this Project
Have the necessary tools for this DIY project lined upward before you start—you'll relieve time and frustration.
Required Materials for this Project
Avert last-infinitesimal shopping trips by having all your materials set ahead of time. Here's a list.
Originally Published: December xix, 2018
Source: https://www.familyhandyman.com/project/how-to-build-window-cornices/
Posted by: rickermordice.blogspot.com
0 Response to "How To Build Window Cornice Box"
Post a Comment